CPU绑定的几种实现方式
1.了解你的CPU
在现代多处理器系统中(如下图),每个系统(System)可能安装多个处理器(Processor/Socket)芯片,每个处理器可能包含多个核心(Core),每个核心可能包含多个指令流水线。

通过lscpu命令可以查看CPU的信息,下图展示的是某台服务器的信息:
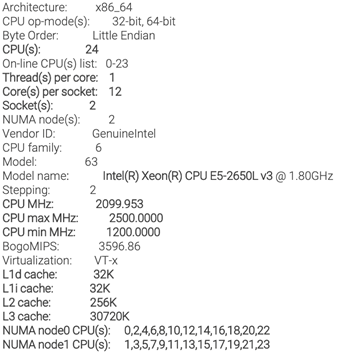
上述信息表明,该服务器:
- 共有24个核心(CPU(s))
- 每个核心有1个线程(即指令流水线)
- 每颗处理器(Socket(s))有12个核心
- 有两颗处理器(NUMA架构)
上述信息还展示了各个核心在NUMA节点上的分布,比如CPU 0是位于NUMA节点0上的。CPU 0通常被用来处理所有中断,比如网络、信号等,所以我们在绑定一些需要频繁处理中断的程序时,就可以把他们绑定在CPU 0或者其他与CPU 0位于同一NUMA节点的CPU上。
2.CPU绑定的意义
一是现代服务器大多采用NUMA多处理器架构,一台服务器会安装多颗处理器(称为NUMA节点),而NUMA架构各节点资源较为独立的设计,决定了在不同NUMA节点共享数据的成本高昂,因此尽量将数据交互较为频繁的程序绑定在同一NUMA节点上是很重要的。
二是进程/线程如果从一个核心切换至另一个核心上运行,需要面临上下文切换、缓存失效等问题,成本也很高。在对性能要求较高的软件中,这已经是造成时延抖动的一大来源之一。
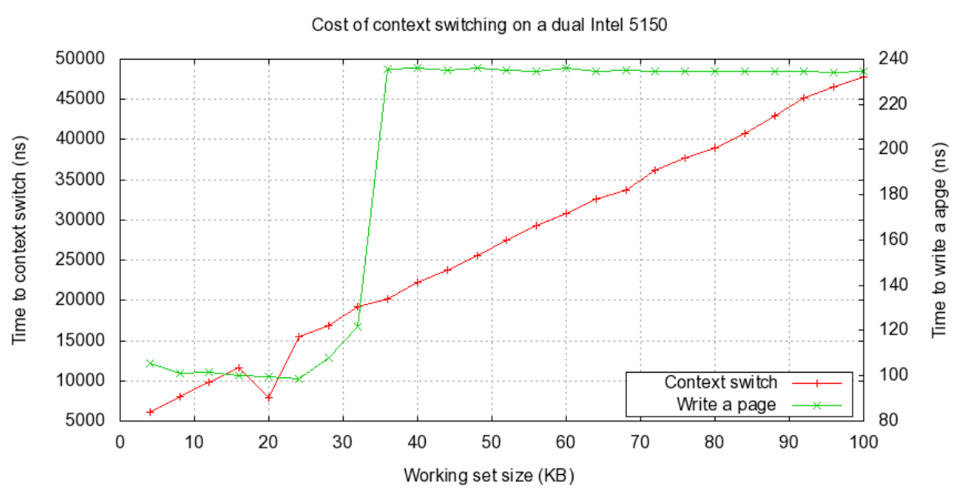
上图展示了一个实测的例子,工作集(working set)较大的进程在进行上下文切换时,其时延可高达50微秒。
3.CPU绑定原理
在Linux系统下,进程都有一个CPU亲和力属性(affinity),通过以下命令可以查询:

以上查询结果的含义是,进程id为4500的进程,可以在0、1、2、3号CPU上运行,我的笔记本的CPU是四核的,因此默认情况下,进程是可以在任意一个核心上运行的。

我们编写下面这样一个程序,观察下Linux进程调度的现象:
#include <stdio.h>
#include <stdlib.h>
#include <unistd.h>

// g++ -o bind_1 bind_1.c

void print_running_cpu()
{
    char qry_cmd[1024] = { 0 };
    sprintf(qry_cmd, "ps -o pid,psr -p %d | tail -n 1 | awk {'print $2'}", getpid());
    FILE *fp=popen(qry_cmd,"r");
    if(fp == NULL)
        return ;

    char cpu_id_str[200] = { 0 };
    fgets(cpu_id_str,80,fp);
    fclose(fp);

    printf("current process %d is running on cpu(%d)\n", getpid(), atoi(cpu_id_str));
}

int main()
{
    print_running_cpu();

    while(1)
    {
        long loop = 4000000000;
        while(loop--)
            ;

        sleep(0);

        printf("----------------\n");
        printf("switched !\n");
        print_running_cpu();
    }

    return 0;
}
这段代码有两个关键逻辑:
- 循环执行空语句:这样程序的CPU占用率会达到100%,方便我们观察程序在哪个核上运行
- 每隔一段时间执行一次sleep(0):主动放弃CPU占用,让Linux重新调度一次,这样进程就有机会被切换到其他核心上执行
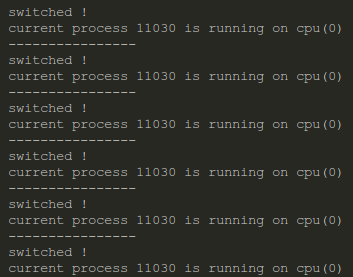
另外,该程序在运行时还会打印自己当前所在的CPU号,运行结果如下:
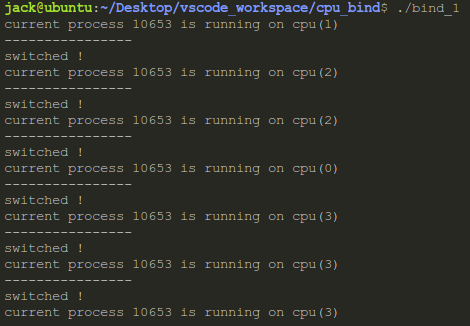
可以看到,进程会不断地在不同的CPU之间跳动。
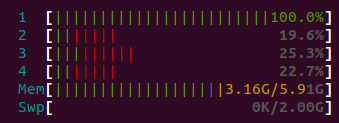
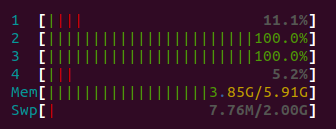
用htop也能观察到同样的结果:
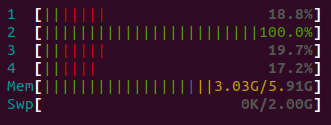

如果这是个时延敏感的系统,这样频繁的在CPU之间跳动,无疑会带来额外的进程上下文切换等开销,造成时延抖动。
4.通过命令绑定(进程)
通过taskset命令可以在不修改程序的情况下从外部将程序绑定至某个CPU核心。
以将上面的进程绑定至CPU 0为例:

从程序的输出来看,在运行时不会被切换到其他核心上:
从htop上看也是如此:
证明绑定的效果达到了。
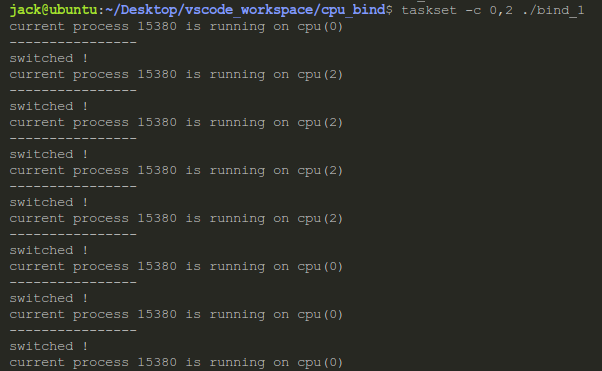
另外,如果我们想将程序绑定到一个CPU列表上,比如绑定到NUMA node0上的所有CPU,通过taskset命令也可以做到:

这样的话,进程就只能在0号和2号CPU上运行了。
在实际的生产系统运维过程中,运行程序前是不知道程序的pid的,好在taskset命令还支持启动时指定亲和力,方法如下:
5.通过命令绑定(线程)
我们编写如下程序,启动两个线程,各个线程循环执行空语句,每隔一段时间sleep(0)一次,方便操作系统将线程切换到其他核上运行。
#include <stdio.h>
#include <stdlib.h>
#include <unistd.h>
#include <pthread.h>

// g++ -o bind_2 bind_2.c -lpthread

void print_running_cpu()
{
    char qry_cmd[1024] = { 0 };
    sprintf(qry_cmd, "ps -o pid,spid,psr -T -p %d | grep %d | tail -n 1 | awk {'print $3'}",
        getpid(), gettid());
    FILE *fp=popen(qry_cmd,"r");
    if(fp == NULL)
        return ;

    char cpu_id_str[200] = { 0 };
    fgets(cpu_id_str,80,fp);
    fclose(fp);

    printf("[%d] : current thread(%d@%d) is running on cpu(%d)\n",
        gettid(), gettid(), getpid(), atoi(cpu_id_str));
}

void* thread_func(void* p_arg)
{
    print_running_cpu();
    while(1)
    {
        long loop = 4000000000;
        while(loop--)
            ;

        sleep(0);

        printf("[%d] : ----------------\n", gettid());
        printf("[%d] : switched !\n", gettid());
        print_running_cpu();
    }
}

int main()
{
    print_running_cpu();

    pthread_t thr_id_1, thr_id_2;

    pthread_create(&thr_id_1, NULL, thread_func, NULL);
    pthread_create(&thr_id_2, NULL, thread_func, NULL);

    while(1)
        sleep(1);

    return 0;
}
这段代码跟前面用的测试代码比较类似,只是把一些命令以及接口从进程换成了线程,运行效果如下:
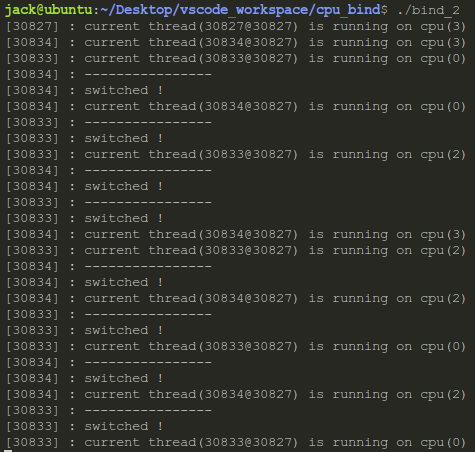
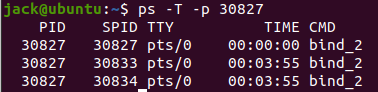
可以看到如下信息:
- 主线程id为30827(以下简称27)
- 启动的两个线程分别为30834(以下简称34)和30833(以下简称33)
- 线程34和线程33在运行期间都进行多次核心切换
以下命令可以用来查看进程以及它启动的线程(SPID列为线程id):
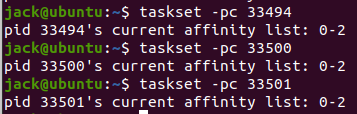
taskset命令依然适用于线程,执行如下命令查看CPU亲和性设置:
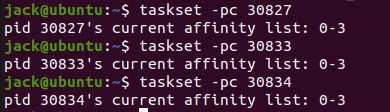
可以看到进程(37)以及他的两个线程都是可以在所有CPU上运行的。
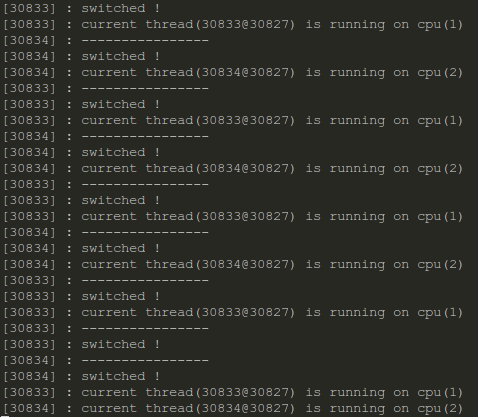
执行如下命令设置线程的CPU亲和性(线程33绑定到1号CPU,线程34绑定到2号CPU):
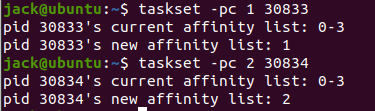
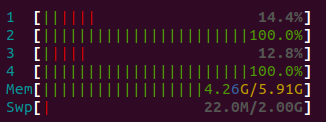
设定后,线程不再切换:
htop上也能看出效果:
美中不足的是,这次我们不能通过taskset+程序名直接启动程序并实现各个线程绑定不同核心了,该命令只能支持到进程级别,也就是说它会把进程下的所有线程都设置为相同的亲和度,如下图:

不过也不是没有解决办法,我们可以编写脚本启动并获取线程id,再多次调用taskset,指定线程id,将其绑定到不同核心上即可。
6.编程绑定(C接口)
我们使用sched_xxxaffinity接口实现通过编程绑定CPU核心,该接口既能绑定进程又能绑定线程,示例代码如下:
#include <stdio.h>
#include <stdlib.h>
#include <unistd.h>
#include <pthread.h>
#include <sched.h>

// g++ -o bind_3 bind_3.c -lpthread

void print_running_cpu()
{
    char qry_cmd[1024] = { 0 };
    sprintf(qry_cmd, "ps -o pid,spid,psr -T -p %d | grep %d | tail -n 1 | awk {'print $3'}",
        getpid(), gettid());
    FILE *fp=popen(qry_cmd,"r");
    if(fp == NULL)
        return ;

    char cpu_id_str[200] = { 0 };
    fgets(cpu_id_str,80,fp);
    fclose(fp);

    printf("[%d] : current thread(%d@%d) is running on cpu(%d)\n",
        gettid(), gettid(), getpid(), atoi(cpu_id_str));
}

void print_thread_affinity()
{
    cpu_set_t cpu_mask;

    CPU_ZERO(&cpu_mask);
    sched_getaffinity(gettid(), sizeof(cpu_mask), &cpu_mask);

    printf("[%d] : current thread(%d@%d) can be running at cpu(",
        gettid(), gettid(), getpid());

    int cpu_num = sysconf(_SC_NPROCESSORS_CONF);
    for(int i = 0; i < cpu_num; ++i)
    {
        if (CPU_ISSET(i, &cpu_mask))//判断线程与哪个CPU有亲和力
        {
            printf("%d, ", i);
        }
    }
    printf(")\n");
}

void bind_thread_to_cpu(int cpu_id)
{
    cpu_set_t cpu_mask;
    CPU_ZERO(&cpu_mask);

    CPU_SET(cpu_id, &cpu_mask);
    print_thread_affinity();
    printf("[%d] : binding current thread(%d@%d) to cpu(%d)\n",
        gettid(), gettid(), getpid(), cpu_id);
    sched_setaffinity(gettid(), sizeof(cpu_mask), &cpu_mask);
    print_thread_affinity();
}

void* thread_func(void* p_arg)
{
    printf("[%d] : ----------------\n", gettid());
    printf("[%d] : setting cpu affinity for thread(%d@%d) ...\n",
        gettid(), gettid(), getpid());
    int bind_cpu_id = *(int *)p_arg;
    bind_thread_to_cpu(bind_cpu_id);
    printf("[%d] : ----------------\n\n", gettid());

    sleep(1);

    print_running_cpu();

    while(1)
    {
        long loop = 4000000000;
        while(loop--)
            ;

        sleep(0);

        printf("[%d] : ----------------\n", gettid());
        printf("[%d] : switched !\n", gettid());
        print_running_cpu();
    }
}

int main()
{
    int cpu_id_0 = 0;
    int cpu_id_1 = 1;
    int cpu_id_2 = 2;
    int cpu_id_3 = 3;

    pthread_t thr_id_1, thr_id_2;

    pthread_create(&thr_id_1, NULL, thread_func, &cpu_id_1);

    sleep(1);

    pthread_create(&thr_id_2, NULL, thread_func, &cpu_id_3);

    while(1)
        sleep(1);

    return 0;
}
运行效果如下:
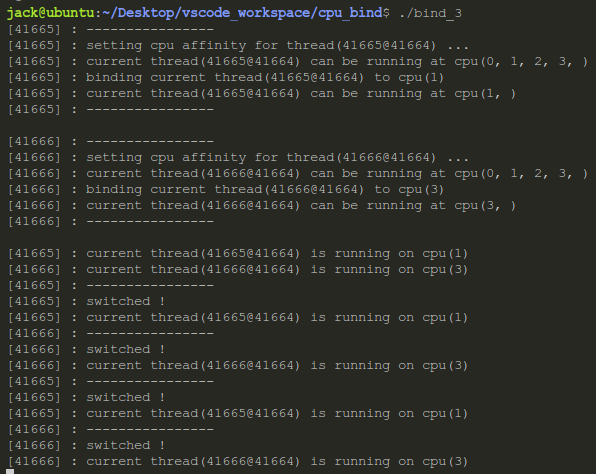
结果不言而喻,这里仅简单解释下程序:
- sched_xxxaffinity接口虽然明确说明只能传pid,但传入spid(线程id)也是可以的,线程id使用gettid()接口获得
- CPU_SET等接口传入的cpu_id并不是掩码,而是0、1、2、3等这样的数字
- sched_xxxaffinity接口的第一个参数可以填成0, 表示当前进程(线程)
7.编程绑定(pthread接口)
pthread也提供了类似的接口,示例程序如下:
#include <stdio.h>
#include <stdlib.h>
#include <unistd.h>
#include <pthread.h>

// g++ -o bind_4 bind_4.c -lpthread

void print_running_cpu()
{
    char qry_cmd[1024] = { 0 };
    sprintf(qry_cmd, "ps -o pid,spid,psr -T -p %d | grep %d | tail -n 1 | awk {'print $3'}",
        getpid(), gettid());
    FILE *fp=popen(qry_cmd,"r");
    if(fp == NULL)
        return ;

    char cpu_id_str[200] = { 0 };
    fgets(cpu_id_str,80,fp);
    fclose(fp);

    printf("[%d] : current thread(%d@%d) is running on cpu(%d)\n",
        gettid(), gettid(), getpid(), atoi(cpu_id_str));
}

void print_thread_affinity()
{
    cpu_set_t cpu_mask;

    CPU_ZERO(&cpu_mask);
    pthread_getaffinity_np(pthread_self(), sizeof(cpu_mask), &cpu_mask);

    printf("[%d] : current thread(%d@%d) can be running at cpu(",
        gettid(), gettid(), getpid());

    int cpu_num = sysconf(_SC_NPROCESSORS_CONF);
    for(int i = 0; i < cpu_num; ++i)
    {
        if (CPU_ISSET(i, &cpu_mask))//判断线程与哪个CPU有亲和力
        {
            printf("%d, ", i);
        }
    }
    printf(")\n");
}

void bind_thread_to_cpu(int cpu_id)
{
    cpu_set_t cpu_mask;
    CPU_ZERO(&cpu_mask);

    CPU_SET(cpu_id, &cpu_mask);
    print_thread_affinity();
    printf("[%d] : binding current thread(%d@%d) to cpu(%d)\n",
        gettid(), gettid(), getpid(), cpu_id);
    pthread_setaffinity_np(pthread_self(), sizeof(cpu_mask), &cpu_mask);
    print_thread_affinity();
}

void* thread_func(void* p_arg)
{
    printf("[%d] : ----------------\n", gettid());
    printf("[%d] : setting cpu affinity for thread(%d@%d) ...\n",
        gettid(), gettid(), getpid());
    int bind_cpu_id = *(int *)p_arg;
    bind_thread_to_cpu(bind_cpu_id);
    printf("[%d] : ----------------\n\n", gettid());

    sleep(1);

    print_running_cpu();

    while(1)
    {
        long loop = 4000000000;
        while(loop--)
            ;

        sleep(0);

        printf("[%d] : ----------------\n", gettid());
        printf("[%d] : switched !\n", gettid());
        print_running_cpu();
    }
}

int main()
{
    int cpu_id_0 = 0;
    int cpu_id_1 = 1;
    int cpu_id_2 = 2;
    int cpu_id_3 = 3;

    pthread_t thr_id_1, thr_id_2;

    pthread_create(&thr_id_1, NULL, thread_func, &cpu_id_1);

    sleep(1);

    pthread_create(&thr_id_2, NULL, thread_func, &cpu_id_3);

    while(1)
        sleep(1);

    return 0;
}
pthread提供的接口跟sched_xxxaffinity接口极其类似,主要区别在于接口的第一个参数不同:
- 一个是通过pthread_self()获得,一个是通过gettid()获得
- 两者的值并不相同
- pthread_self()的值只在程序内可见,在程序外面无法通过命令查询,而gettid()的可以